Friday, January 28, 2011

steering stem bearings

I bought a set of All Balls Racing steering stem bearings and with seals from a local dealer for $35. As I expected, they are the same part number for both the RMZ250 and the DR650 (plus a whole bunch of other Suzuki bikes). The lower bearing needs to be pressed on, while the top one just slides on and off with by hand.

To get the old lower bearing removed, I used a pry bar, then a hammer with a piece of steel used as a punch. To press the new one into place I used length of threaded rod, and a selection of large, flat washers (including one with a 1 1/4" centre hole to press up against the bearing itself over, slid down over the steering stem), plus a piece of 1 1/2" square tubing (left over from the trailer I built).

The new bearing slides on until it gets almost to the end...
then you need to press it on carefully the rest of the way.
You either need a shop press to do it, or you can MacGyver a special tool like I did.


Slide a big, fat washer down over the steering stem and let it rest on the top of the bearing (and I also used the old bearing race to protect the roller bearing), then a piece of 1 1/2" square tubing works well as a spacer to get you to the end of the steering stem.

It's that last 3/4" or so that the bearing needs to be pressed.

Then just crank the nuts onto the threaded rod and voilĂ , the bearing is forced into position smoothly.

Bearing and dust seal now in place.


These bearing fit quite a number of different bikes.


The home made bearing press may look pretty ghetto, but it gets the job done without putting undue stress on the new bearings.


I use Permatec synthetic grease on all the bearings.
Last week, I installed new wheel bearings and seals in both the front and rear wheels.


I've been trying to streamline the toolkit that I carry on the bike. Picked up these two hex socket adapters shown... a 1/4" drive adapter and a 3/8" adapter, and a 6" long #2 Philips screwdriver that fits nicely in the hex ratchet (this ratchet is really slick and I use it all the time). Along with a 10mm & 12mm wrenches, plus tire removal tools, most of the basics are covered.

Monday, January 17, 2011

Fork seals

While it's the middle of winter here in Canada, I figured it couldn't hurt to tear these fancy Showa dual-chamber upside-down cartridge forks apart and have a look inside -- just so I know for sure what I bought. They came off a 2007 RMZ250, and from what I know, the bike belonged to a motocross racer and had been re-sprung and/or re-valved for his weight. He was apparently ~ 175 lbs, which is 20 lbs less than me. Judging by the Race Tech stickers, I assume any upgrades were done using their parts.

Well, after taking them all apart and fitting new seals and dust covers, I am pretty sure the springs were replaced. The OEM springs are supposed to have a marking at one end, and the springs I found inside do not. I have no idea what the spring rate is, but I only assume they are probably stiffer than stock springs. As for valving work, I can't say because I can't tell what was supposed to be in there from the factory. If I had to guess, then I'd say only the springs had been swapped out.

The Suzuki service manual calls for 370 ml of 5W oil in the outer chamber, and 193 ml of 5W oil in the inner chamber. But I found something very different the old oil: in the first fork leg, the outer chamber had about 600 ml in the outer chamber, and 200 in the inner chamber. Yikes!  Then when I disassembled the other fork leg, the outer chamber had almost nothing (like, maybe 50 or 100 ml) and the inner chamber had about 200 ml.  What the hell happened there? Was the person who previously serviced/upgraded these forks drunk? Sniffing glue?

Anyway, here are a few photos:


Because I am too cheap to actually buy a seal driver, I improvised. After an unsuccessful search of the basement for a piece of ABS or PVC pipe that would fit, an idea popped into my head when I was looking at my caulking gun. So I cut a short piece of the heavy cardboard from a tube of caulking.


A set of All Balls fork seals and dust caps cost about $35 at a local dealer.
2 litres of Motul 5W Factory Line synthetic fork oil cost $30 at a local dealer.


Friday, January 14, 2011

Trail Tech Vapor speedo / computer

Because I'm planning to use the RMZ wheel with my new RMZ front end, I will lose the OEM speedometer's functionality. This is because the RMZ is not a road-legal bike, and therefore, the front axle/hub has no speedometer drive gear, as is typically found on road-going bikes. So this meant going to an electronic / magnet type speedo solution. A big advantage to this is that most computerized options these days are far more accurate for measuring speed than the old mechanical speedo, plus these high-tech models include lots of extra features: tachometer, clock, engine temperature, shift indicator, and some other stuff. I don't believe it has a voltage gauge.

A friend of mine, who rides a Honda XR650L, bought a Vapor computer last summer and never got around to installing it. He also bought some accessories to go with it: two aluminium mounting dashboards, brackets, and stuff. He gave me a fantastic price of $75, plus the shipping to my door.


Thursday, January 13, 2011

rear shock upgrade

Upgrading the front suspension hardly seems worth the effort if you ignore the rear pogo stick.

So, after many hours reading and researching all the options, I've finally decided to go with a complete rebuild of my OEM shock. Cogent Dynamics is well known for building quality shocks and many DR owners have praised Cogent's work when it comes to making a tired old shock perform a million times better.

Here's exactly what the upgrade will include:

". . . a new seal head assembly with bushings, seals and o-rings, a new shock shaft with provision for the rebound transfer rod, a new mounting clevis with a CNC’d aluminum adjuster knob for rebound damping control, a new piston with shims, a needle jet and needle for the same and a new spring clip to mount either the stock shock spring.


In addition to the high quality parts and expert installation, each shock is custom setup to your needs and thoroughly tested on our Roehrig Damper Dynamometer to ensure you of the optimum performance."
I will also spend the extra cash for the optional Mil Spec hard coating (AOL3 Ceramic), which
". . . provides lower internal operating friction, lower temperatures, longer time between servicing as well as extending the longevity of the shock."
The deal is that I remove the shock, box it up and ship it to North Carolina. Once they've completed all the work, they ship it back to me. From what I've heard, it will barely be recognizable as my original part.  All of this will cost me well over $500 with shipping but their customers all swear it's worth every penny.

I pulled the shock this evening, packed it neatly in a box, and dropped it off at the post office. I expect to have it back in 3-4 weeks, which is good because we'll still have snow on the ground.

the "before" picture


Update on the RMZ front end swap: I ordered some new All Balls Racing fork seals and have not found the time to install them yet. I hope to do it this weekend. I also bought a new set of All Balls Racing steering stem bearings, and some Permatec Ultra Slick Extreme Sport synthetic grease. I'm also hoping to polish the triple clamps and get it all bolted on the frame in the next 2 weeks.

Monday, January 10, 2011

2011 North American International Motorcycle SUPERSHOW

Took the train to Toronto for the weekend to attend the big winter motorcycle show with Sean. The train was a nice, refreshing way to travel: didn't have to worry about traffic, bad weather, or parking. And with gas costing $1.15 a Litre, a round-trip train ticket wasn't much more than I'd have spent on gas for the minivan.

Had a great time hanging out with Sean, and we spent pretty much the entire day at the show on Saturday. Overall, the show was as I expected, that is to say that it wasn't particularly awesome, not particularly horrible. The scale of the show made up for its short-comings: this is the biggest show around these parts so at least there was lots to see. The two things that disappointed me most:

1) the new Triumph Tiger XC 800 was nowhere to be found (although I hear it was present at the manufacturers' trade show that was held there a 6 weeks ago);

2) despite having seached every square inch of every hall, I was not able to find Paddy Tyson -- an Irish guy who wanders the globe on two wheels. I wanted to buy a copy of his book and spend a few minutes chatting with him. Oh well, I guess I'll buy the book online. http://paddytyson.com/


The photos:


Electric trials bike


These guys had a good display, nice selection of stuff.


1937 Rudge Sports Special

Father and daughter team travelled across Canada on these old-school Honda Cubs


I've seen this bike before, and it's still a beauty.

1982 Honda GB500 Tourist Trophy

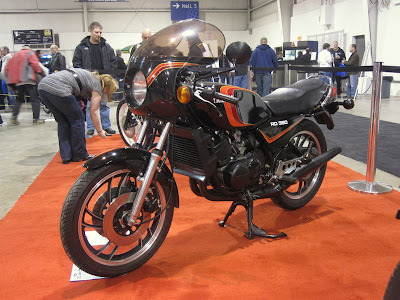
1982 Yamaha RD350LC

1986 Bimota DB1 (750cc Ducati engine).
I can't believe it's been 25 years since I first saw
these things on the covers of motorcycle magazines

Italian beauty: Guzzi V7 Café

Guzzi Griso


MV Augusta F4

Sean trying out a used FJR


Speed Triple

Boss Hoss with a 376 cubic inch Corvette engine ... redonkulous !

Outlandish, over-exaggerated, and just plain stupid.


Indian Chief Dark Horse.
$28,000


Confderate P120 Fighter Combat


Confederate P120 Black Flag


Confederate Hellcat

Confderate P120 Fighter Combat

Confderate P120 Fighter Combat


Harley Davidson with hearse side-car

1989 Honda RC30/VFR750R (V4)

1967 Triumph 650 Hardtail

I just barfed in my mouth

Interesting

iPod / iPhone dock

Wups.
Who dropped that?
Better yet: who's gonna pick it up?

Victory Vision lying on its side like a beached whale