Monday, August 15, 2011

Ride around Lavant, Poland, Calabogie


After checking the weather forecast on Thursday, I decided Friday looked better for riding than Saturday -- Saturday was to be stinking hot with lots of humidity, while Friday was sunny but not quite so hot.  So I packed up my Pelican 1500 with spare front & rear tubes, my regular tools, 12V air pump, water, Gatorade, energy bars, spare cell phone / camera / GPS batteries, and some fishing stuff.

I brought my GoPro 960 camera along as usual. It was recently replaced under warranty because the old one suddenly developed a bug in which it would randomly stop recording sound. Very annoying how the audio would cut in and out while recording. But I've gotta say that GoPro was awesome to deal with. Once their tech support people agreed that my camera was in fact defective, it was as simple as sending it back to them, and a brand new one shipped out right away. They were great in their communication with me, too, sending me email updates every step of the way (they emailed me as soon as my defective unit arrived at their offices, and another email to confirm that they tested it and confirmed the defect, then another email the next day to let me know that a replacement was shipped out, plus the tracking code for the shipping. All in all, they were great to deal with. They stood behind their product 100% and gave me terrific service.


Got lots of bites at Green Lake but I only managed to lose 4 lures before I moved on.


Testing out my new Garmin GPSMAP 60Cx, alongside my trusty
Garmin Oregon 300. Both are quite similar, but they are also quite different.


Joe's lake. While I didn't lose any lures here, I still didn't catch any fish.

Testing the timer function on my phone's camera.

The two GPS units on RAM mounts, with my new
Tusk Chub Big Bars in the ATV bend. They are nice
and high compared to the lower YZ bend bars I had.  
These are much more comfy when standing on the pegs.

A green swampy hole just off New Road (off Hwy 511)

Somewhere along the K & P rail trail.


Some video highlights from the day's ride. All together,
I managed 300 Kms with about 3 hours of fishing.
I used the GoPro chest mount harness for most of the
front-facing video, plus I used a custom RAM mount I made
for the GoPro camera, attached to the rear luggage rack.

Tuesday, August 9, 2011

Frankenbike - KTM fairing

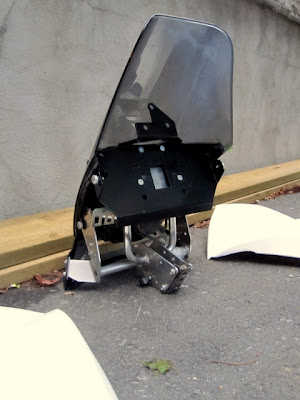
Here's a sneak preview of my next project: trying to devise a scheme to graft this KTM headlight, windscreen, dashboard assembly and side fairings onto my DR650.  Having already mounted a GSXR exhaust system, RMZ forks, triples and front wheel, and Yamaha R6 throttle tube, it is really turning into a true Frankenbike.


KTM 950 Adventure OEM headlight, windscreen, dash,
aluminium mounting frame and aftermarket side fairings.


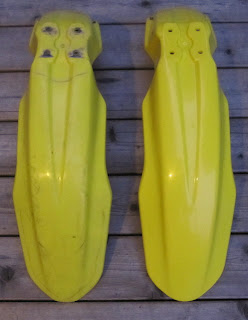
Oh, and a side note:  the RMZ250 fender that was included with the RMZ forks was bent out of shape and covered in scuff marks and scratches. This $19 replacement made by Polisport is a very good replica of the original, and top quality. Holes were pre-drilled and it fits perfectly. Identical shape as the original -- obviously they used an OEM fender for the mould. Bought from RockyMountainATV.com  (Part # 1146680031).  Of course, it goes very well with the Polisport RMZ lower fork guards I threw on there a couple of months ago (also purchased from RockyMountainATV).


The ratty old RMZ fender was looking pretty tired.
The $19 Polisport replica fender is awesome.


Thursday, August 4, 2011

Squeaky starter motor - an easy fix.


Late last fall when the mornings turned quite chilly (frost on the ground) the starter on the DR began to make some funny sounds, similar to that of a wheezing duck -- a kind of sqeaky, squealing noise. It sounded exactly like this video I found on YouTube:


After reading of similar complaints from other DR owners on ADVRider, the diagnosis sounded plausible:  dry armature inside the starter motor. Requires a bit of lubrication. The end of the armature opposite the drive gear rests in a bushing (not a bearing). Apparently these bushings are made of a sintered material that contains some type of lubricant, whic is released slowly as the sintered material wears away, thus providing a permanent lubrication system. However, if the sintered material gets heated up or burned, it glazes over which prevents the sintered material from lubricating the shaft properly. In warmer weather, it doesn't matter much but when the cold weather hits, the dry rubbing makes a squeaky sound. I guess the best solution would be to replace the bushing in the end cap of the starter motor. But an easy fix that will last a couple of years is to simply put a dab of grease in the bushing. This quick and easy fix takes about an hour and costs nothing. It's also a good way of checking the internals of the starter motor, especially the parts that normally wear out (like the brushes).

First step: because you will need to remove the Cam Chain Tensioner (CCT) it's important to make sure the engine is at top dead centre (TDC) on the compression stroke. To do this, remove the plug on the flywheel cover so you can line up the timing mark. Then rotate the engine by hand (using a ratchet on the flywheel, or by turing the rear tire slowly with the bike in 3rd, 4th, or 5th gear). Remove a spark plug and keep your finger over the hole so that you can tell when the air in the cylinder is being compressed.

The timing mark on the flywheel as seen through the inspection hole.


I also use a plastic drinking straw in the spark plug hole
to make sure that the piston is at the top (but you need to be
sure it's at the top ON THE COMPRESSION STROKE.
That's why you keep your finger over the hole).


As a safety precaution, it's a good idea to disconnect
the + positive terminal from the battery.
Remove the exhaust header pipe

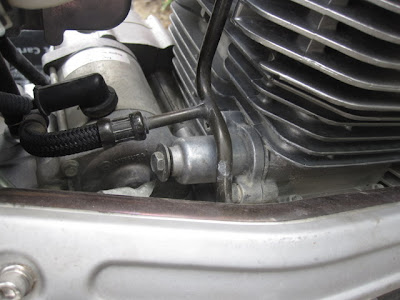
Remove the upper and lower bolts for the oil line
and move it out of harm's way.

Moving the oil cooler line out of the way gives
unobstructed access to the starter motor.
I like to put the bolts and crush washers back in
place to avoid losing them, and also to avoid getting
dirt inside the engine.

Remove the cam chain tensioner (CCT)

Then, remove the starter.

The starter motor removed.

End cap removed reveals the brushes as they are pressing
against the commutator with the wound springs.


A small dab of grease squeezed into the hole at the end of the armature.

A small dab of grease in the end-cap bushing.

I cleaned the guts of the starter using air compressor to blow the dust out.

Cleaned the rubber O-ring and cleaned up the casing a bit.

Wiped down all the grease and crap from the engine.


Getting ready to wind up the spring in the cam chain tensioner (CCT)
**note the long shaft sticking out: it needs to be wound back in before re-installing the CCT.

Remove the bolt that plugs the hole at the end of the CCT (right side in the photo above, bolt is removed)
This exposes a small flat screw inside. Use a small screwdriver to wind up the spring as you push in with your thumb. Keep turning the screwdriver slowly until you hear/feel a click. Then the pin is locked in and you can take your thumb off the end.
CCT pin is locked once the spring has been wound up with a flat scredriver.
Reassembly:
1. install the starter and clutch cable bracket
2. install the CCT and then use the flat screwdriver to unlock the spring
(which will apply tension on the cam chain)
3. re-connect the oil cooler line.
4. re-install exhaust header pipe
5. re-connect positive battery terminal


All buttoned up.